Section 4.1 - Setting up for a new race
Section 2.6 gave a brief overview of creating a new project, and now we will dive into the details.
The first step to creating a new project is to choose a project name. The name must use only letters, numbers, and underscore. It must also not be the name of an already existing project (or, more precisely, an already existing file or directory in the fstimer directory). If a project of that same name already exists, fsTimer will throw an error and will not let you advance until you choose a name that isn't already in use:
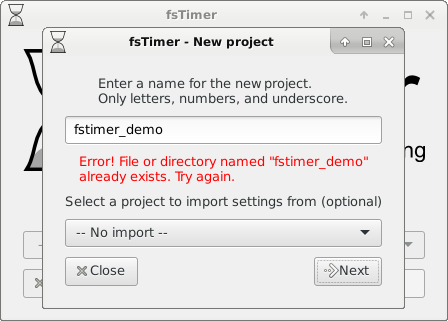
If you want to use a name that is already taken by an existing file or folder, you will have to rename or delete that file or folder.
Using the drop-down menu you can (optionally) select a project from which to import the settings. This will pre-fill all of the later windows in the project creation process with the settings from that project.
The next window allows you to choose the type of the race:
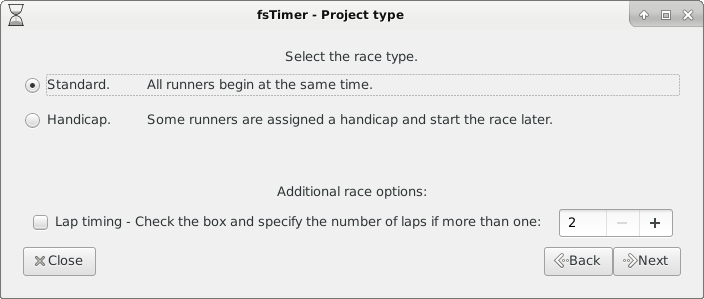
A standard race is one where all racers have the same start time. In a handicap race, a "Handicap" time must be specified for all racers. Their final time is then calculated as the marked time minus the handicap. This allows racers to start at different times - a racer could start five minutes late, and by specifying a handicap of "0:05:00" for that racer, his or her time in the results would be corrected. Usually this is done for a race where all runners provide their handicap relative to a base time, and runners start at different times with the hope of all crossing the finish line around the same time.
For lap timing, times are marked each time a racer completes a lap. The results printout will then display the total time along with the time for each of the individual laps.
The next window allows you to specify the fields that will show up in the registration database.
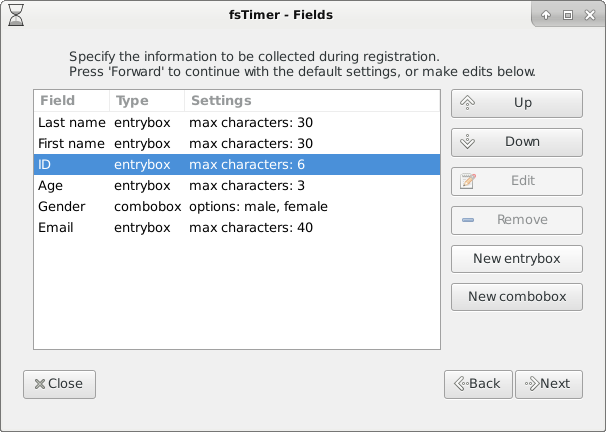
The "Up" and "Down" buttons allow you to change the order of the fields. This is the order in which they will appear in the registration database: The top entry in this window will be the furthest left column in the registration window, and the bottom entry in this window will be the furthest right column in the registration window. This is also the order that they will show up in the results printouts, should you choose to have them in the results printouts.
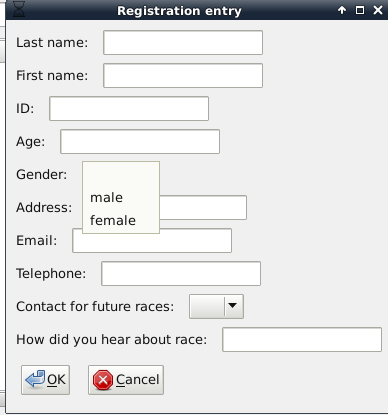
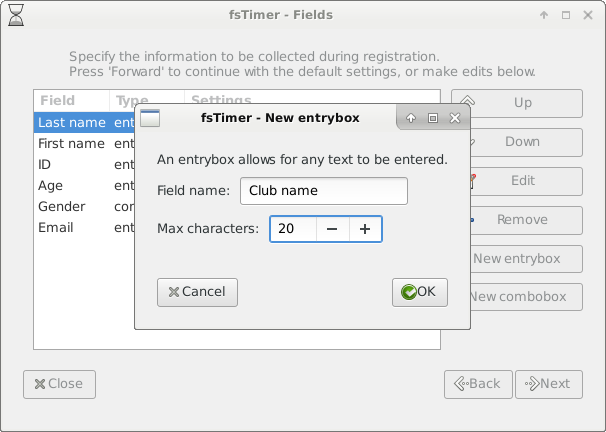
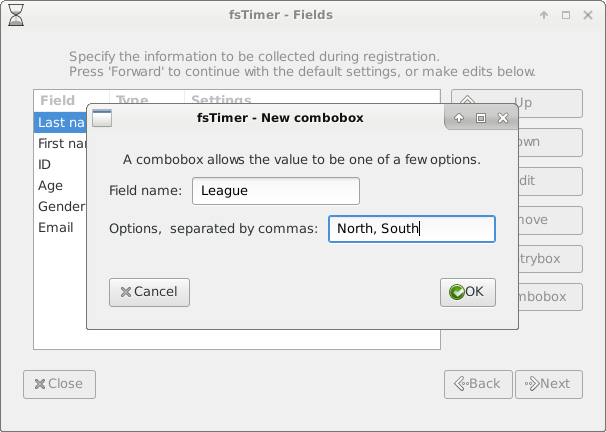
The "Remove" button removes a field. ID and Age, however, are hard-coded fields and cannot be removed. ID is critical for the timing itself. If you don't want to use Age, you can simply leave that field blank. If it is a "handicap" race, then the field "Handicap" is also required. The "New.." buttons allow you to create a new entrybox or combobox. A combobox means in the registration database the entry will have to take one of a set collection of values. In the window for creating a new registration entry below, "Gender" is a combobox with options "male" and "female" (and blank). An entrybox is a box for freely entering text, like "Last name" and "First name" in the registration entry below.
When creating a new entrybox, you will specify the name of the field (e.g., Last name) and the maximum number of characters to allow in the entrybox. The appropriate maximum number of characters will depend on the field (ID will probably require fewer than Address).
When creating a new combobox, you will specify the name of the field (e.g., Gender) as well as what the options in the combobox should be, separated by commas. For example, "male,female" would indicate that the options should be male and female. A blank option will automatically be added to any combobox, you don't need to worry about adding it yourself.
fsTimer will not allow you to create two fields with the same name.
Next you can specify the divisionals. Again, "Up" and "Down" change the order in which the divisions will appear in the divisional results.

"New" allows you to add a division. Divisions may be defined using a combination of age and any of the comboboxes that were defined as registration fields. For example, if "League" was specified as a combobox in when creating the registration fields, then you could define divisionals using "League." The name of the division that you specify will be used in the divisional results. Then, use the checkboxes to specify which fields you want to use to define the division. In the example below, "Gender" and "League" have been checked, so only those two fields will be used to define the division.
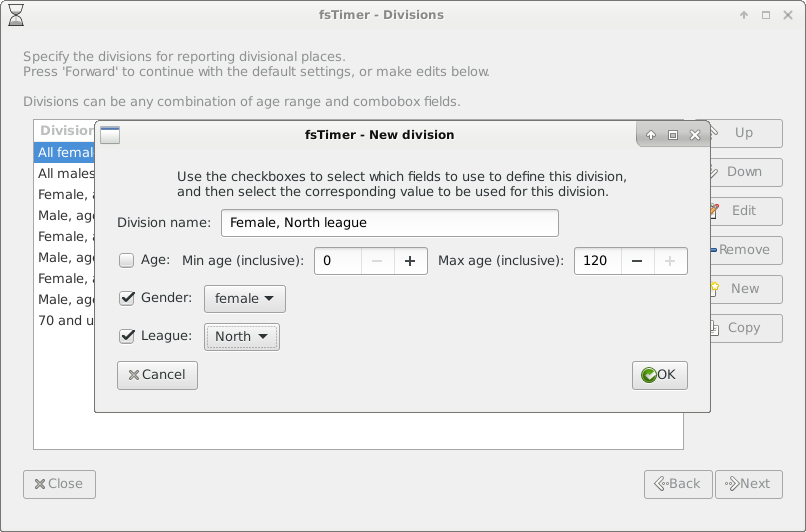
Note that it is OK to have overlapping divisions, if you want. If a runner falls into multiple divisions (e.g., "All females" and "Female, North league") then he or she will simply be listed in each of the divisional results.
"Edit" and "Remove" work exactly as you would expect. "Copy" creates a new division that copies the settings of the currently selected division.
In the next window we choose which information we want to include on the results printouts. These can include any of the registration fields, Time, Pace, and any custom combination of registration field data and time.
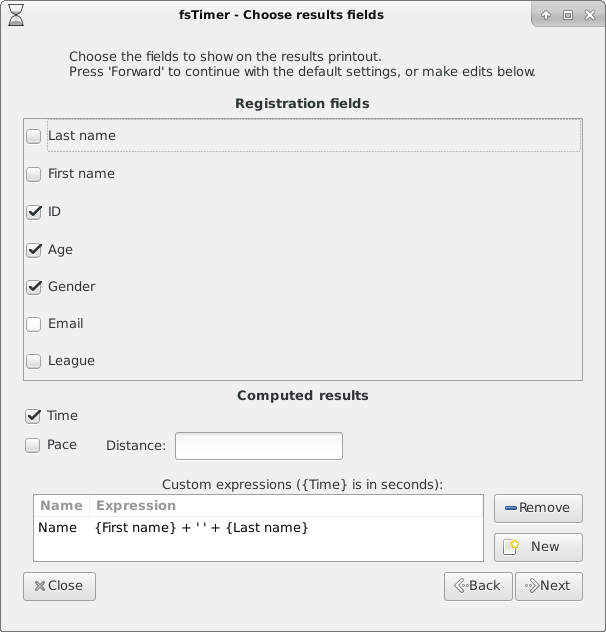
From the top group of checkboxes, you can select which registration fields to include on the results printouts. Next you can select to include Time and/or Pace. If the check box next to Pace is marked, then Pace will be included in the results, computed as Time / distance using the distance that you specify in the Distance entry box. If you enter "5" and your race is a 5k, then the Pace that is calculated will be min/km. If you enter "3.107" for your 5k, then the pace that is calculated will be min/mile.
The last section on the window allows you to create custom computed fields, which can be calculated using any of the registration fields, plus Time. You refer to a field by putting the field name (case sensitive!) in curly brackets, as in the screenshot above. So, in the computed results {First name} refers to field {First name}. You can then use any Python operations that you could use on those fields. {Age} and {Time} are numbers (floats), all other registration fields will be treated as text (strings). {Time} will be the time in seconds.
For example, the expression:
{First name} + ' ' + {Last name}
concatenates First name with Last name, with a space in between (notice that there is a space between the single quotes). Pressing "New" and entering the expression below produces a field in which each runner's time is reduced by 10 seconds for each year of age:
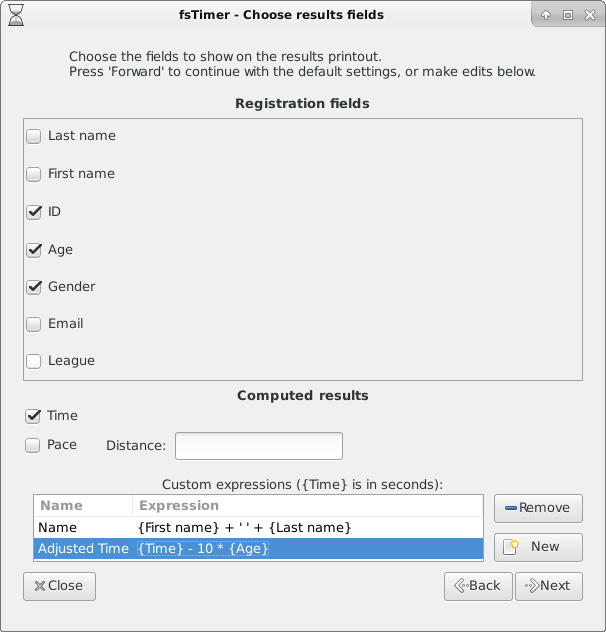
This field would allow us to have a race where older racers are given a time discount according to their age (each year means a 10 second advantage). If you enter fields that don't exist or if the expression isn't proper Python syntax, fsTimer will tell you that it is invalid.
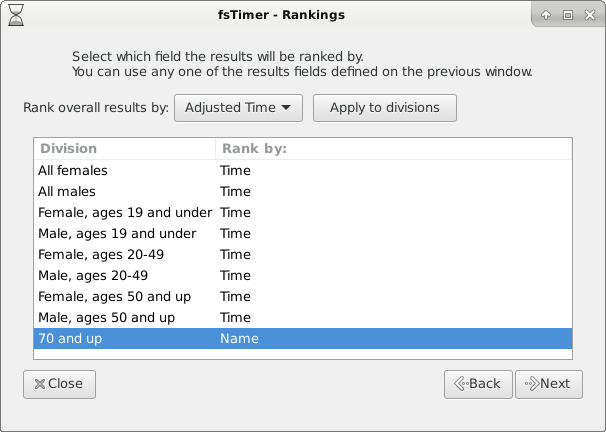
The final window in creating a new project allows us to choose which field the results will be ranked by, for both overall results and for division results. You can rank by any field that will be used in the results (those selected or defined on the previous window). In the example below the overall results will be ranked by Adjusted Time (defined in the previous window), and the divisional results will be sorted by Time, except 70 and up which is sorted by Name:
Once the rankings are specified, a new subdirectory in the fstimer directory with the specified project name will be created (that is, if the project name was project_name, then the directory fstimer/project_name is created). Inside of this directory will be a file project_name.reg. This file stores all of the information that you just specified (registration fields, divisionals, results fields, and ranking fields) in json format. If you want to use the same project on multiple computers (as you will if you want to do registration on multiple computers), then just copy the entire project_name directory into the fstimer directory on all computers.
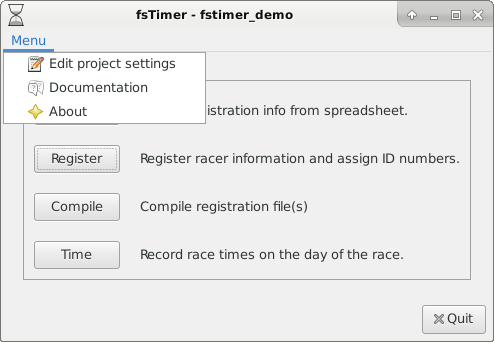
At any point in the future you can edit the project settings by selecting "Edit project settings" from the "Menu" on the main window:
You cannot edit the race type or the change the registration fields. You can, however, edit the divisions, change which fields show up in the rankings, and change how results are ranked. Pressing "Edit project settings" will take you back to the window where you specify divisions, and you can move forward from there. For the project to be updated with the new settings you must press "Next" through all of the windows, and after the final (rankings) window the project settings will be updated.
Continue on to Section 4.2 Importing preregistration - details.