Section 4.5 - Race timing - details
Finally we reach the details about the Timing window. When loading the Timing window, you will have to specify:
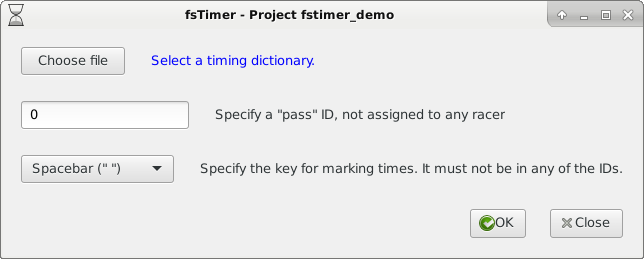
- The timing dictionary. This is the file generated by the Compile window that allows fsTimer to look up registration information by bib ID. It will be named project_name_timing_dict.json, unless you specifically renamed it.
- A "pass" ID. As explained previously, when the pass ID is given to a time, it leaves that time out of the results, essentially blanking it out. It also acts as a placeholder for times that will be later corrected, as described in Section 3.
- The key for marking times. We generally use spacebar, but you can also use period or forward slash. It is important that whatever key you use it is not contained in any of the bib IDs! For instance, if the bib IDs are "A 01", "B 02", etc., with a space actually in the ID, then you should not use spacebar to mark times.
Entering times
The first thing you will do in a race will be to press "Start!" at the exact moment that the race begins. This starts the clock ticking and all marked times will be recorded as time elapsed since this moment.
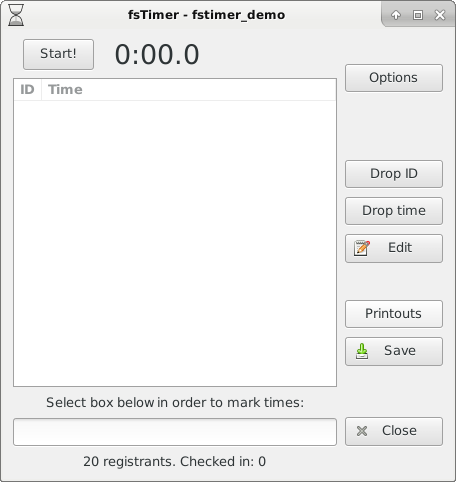
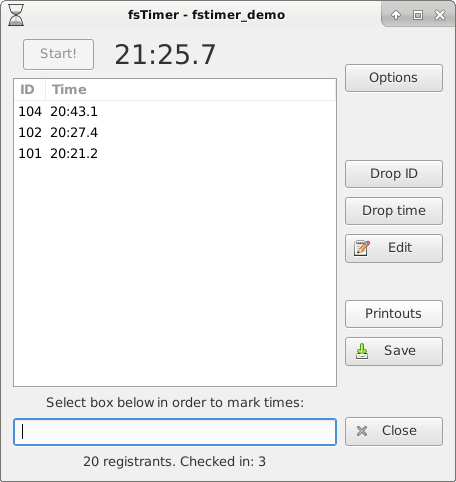
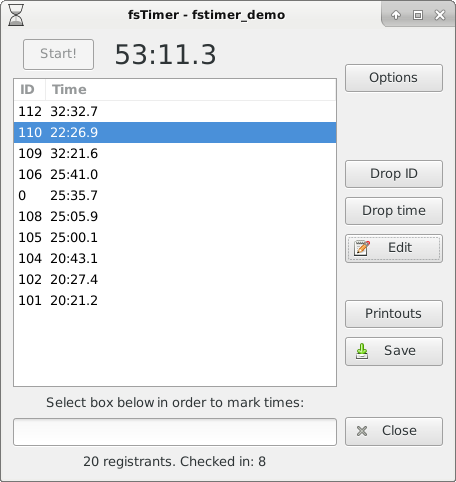
At the bottom of the window in the screenshot above it says "20 registrants. Checked in: 0". The 20 registrants are the number of bib IDs in the timing dictionary. This will generally be the number of people registered for the race, but can differ from the actual number if, for instance, there were overloaded IDs that were de-assigned during compilation. It can also differ from the actual number of racers on the course if there are racers who register and pick up a bib (and thus are in the timing dictionary), but don't end up running the race. As you check in racers (by entering their bib numbers into the timing window), if the bib number is one of those in the timing dictionary, then the "Checked in" number will increment.
All of the tasks related to the timing process take place in the entrybox at the bottom of the window. Make sure that you have clicked in that entrybox, otherwise any input (like pressing spacebar to mark a time, or entering a bib ID) will not be recognized.
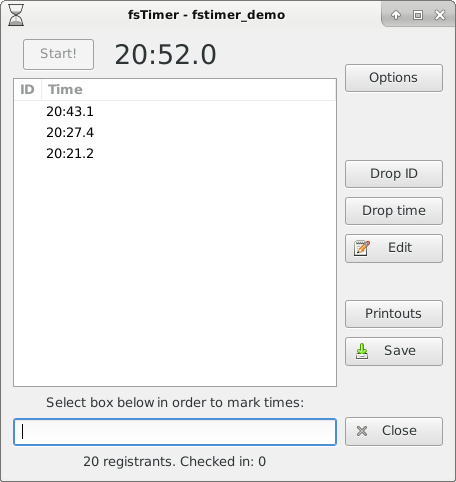
Pressing spacebar (or whichever key you chose for marking times when opening the Timing window) will record the current time (relative to the Start! time) as a blank time in the window. The time is listed as [hr:]min:sec, and the "ID" column will be blank. As multiple times are marked, they will be recorded in their proper order.
This is the stack of marked times, and their corresponding bib IDs must be entered (although there is no hurry; as long as the record of bib IDs stays synchronized with the list of marked times, you can enter them all in at your convenience). Bib IDs are entered by typing them into the entrybox (the same one that must be selected to mark times) and pressing Enter. Note that if you use a USB barcode scanner, then the default behavior of most (all?) USB barcode scanners is to type whatever is in the barcode followed by Enter, so the software will work very naturally with a barcode scanner. Entering "101" will assign that bib ID to the oldest time that has not yet been assigned an ID:
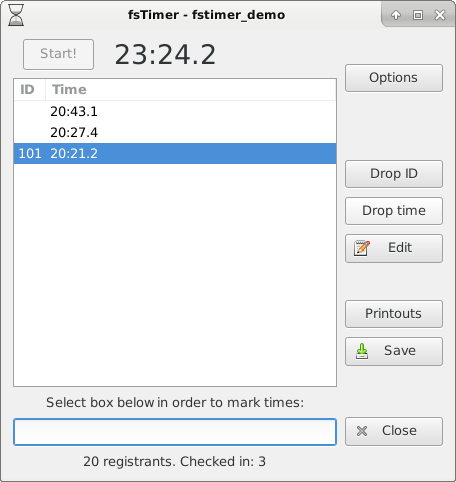
Thus as long as the bib IDs are entered in the same order that they crossed the finish line, they will be correlated with their correct marked times. Entering "102" and "104" fills in the IDs for the next two times:
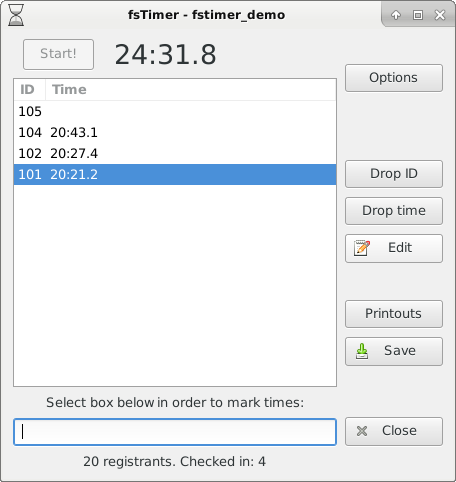
If an ID is entered and there aren't any "blank" times available, it will just be added to the stack of bib IDs and the next marked time will be assigned to it. Here we have entered "105" without any un-assigned marked times, so the time is left blank but will be filled in with the next time that is marked:
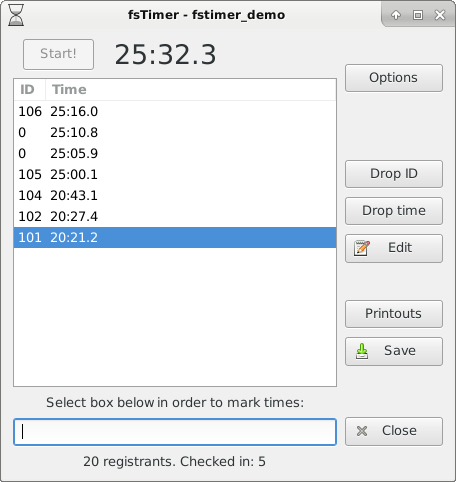
Marked times can also always be filled with the pass ID (we usually choose 0) the same way it would be assigned to a bib ID:
As a note, if you just hit Enter without anything entered into the entrybox, then it will do a usual ID entry where the ID is a blank string ''. Blank IDs are not included in the results printouts (they behave in the same way as the pass ID).
Editing times
The "Edit" button on the right side of the window allows you to edit the ID and/or time of any of the marked times. For instance, suppose one of the pass IDs used in the above screenshot was a placeholder for a runner whose bib ID could not be obtained immediately (see Section 3 for some situations where you might want to do this). We can later go back and replace the pass ID (the 0) with his or her true ID by pressing "Edit", and replacing "0" with the true ID:
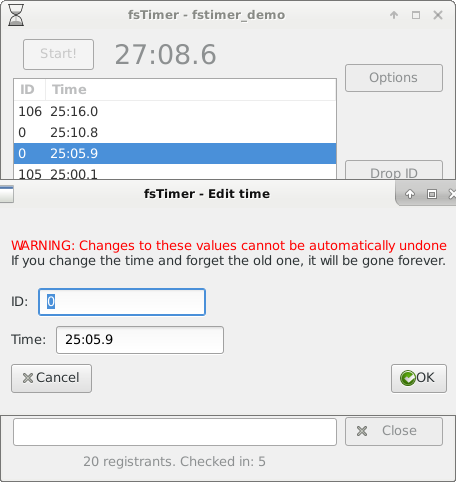
As the red warning states, you should exercise extreme caution when making these edits, as they cannot be undone if you forget the original values.
There are actually two editing modes in the timing window. The first is shown above, when a single entry is selected and "Edit" is pressed. Then, the ID and time of that entry can be modified as desired. Alternatively, an entire block of times can be modified together. This is accomplished by selecting the block of times (using shift) and pressing "Edit":
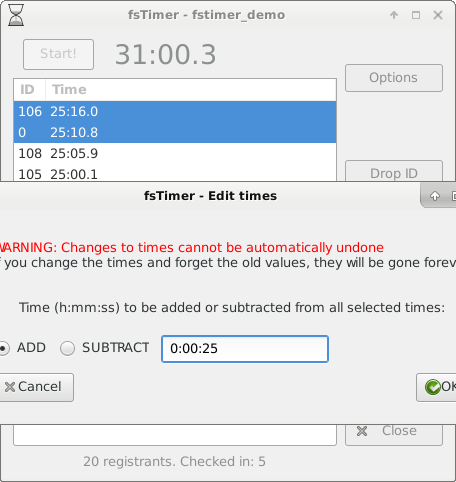
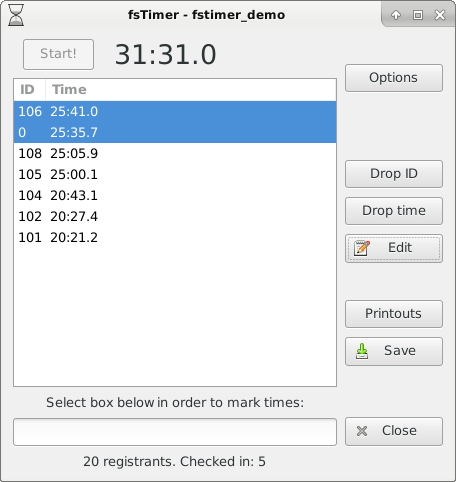
The block edit window allows for all of the selected times to be adjusted forward or backwards by a certain amount of time. In the screenshot above, pressing "OK" will add 25 seconds to all of the times:
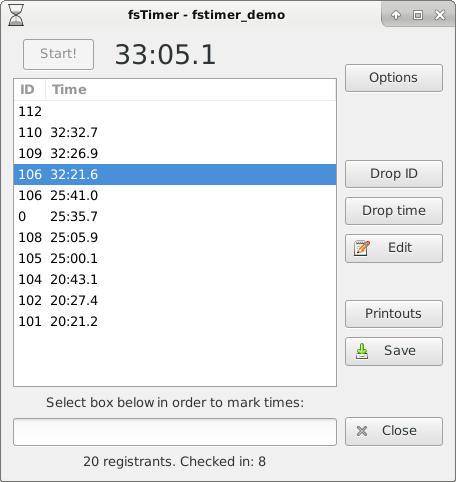
The "Drop ID" and "Drop time" functionalities drop the ID (or, respectively, time) from the selected row, and shift all IDs (resp. times) downward to match. This is useful for keeping the ID stack and the times stack properly synced, for instance, if an ID was accidentally entered twice, or spacebar was accidentally hit twice. Consider the following example, where the ID "106" was erroneously entered twice, and so the stacks are out of sync (there are more IDs than there are marked times):
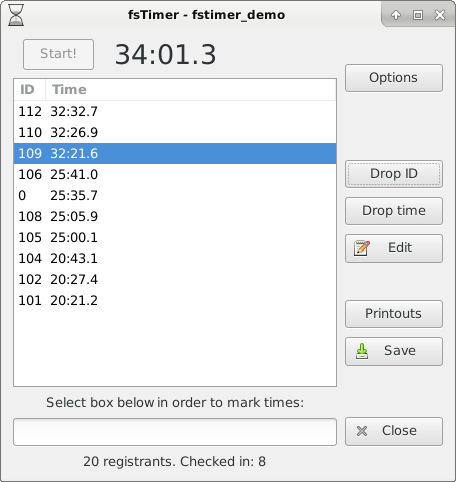
Selecting the 2nd "106" and pressing "Drop ID" yields:
"Drop time" performs the same function, but on the stack of times. Exercise extreme caution when dropping IDs or times, as this cannot be automatically undone.
Saving and printing results
The "Save" button on the right saves the results (starting time, marked times, and bib IDs) to a file whose name will include the date and time that the Timing window was opened (this way, results will never be accidentally overwritten if you open the Timing window at another time). If the Timing window was opened on Jun 1, 2013 at 2:10pm and 30 seconds, then the results are saved to a file project_name_Sat_Jun_1_141030_2013_times.json. The timing session is saved in such a way that it can be loaded from the timing window without any loss.
It is a good idea to save periodically during timing in case something catastrophic happens (like the computer dies), however keep in mind that any time the entrybox in the timing window is not selected (for instance, because you have used the mouse to press the "Save" button), no times may be marked and no IDs may be entered, until the mouse has moved back to select the entrybox.
The "Printouts" button automatically generates nicely formatted results printouts, saved to html in the project directory. These html files can then be opened in any web browser and printed from there. The actual filenames will again incorporate the date and time at which the Timing window was opened, so as to not be automatically overwritten by a later session in which the Timing window is opened. With the same date and time as above, the filenames would be project_name_Sat_Jun_1_141030_2013_alltimes.html for the overall results and project_name_Sat_Jun_1_141030_2013_divtimes.html for the divisional results.
We will now describe the results for a standard, single-lap race. The overall results might look like this:
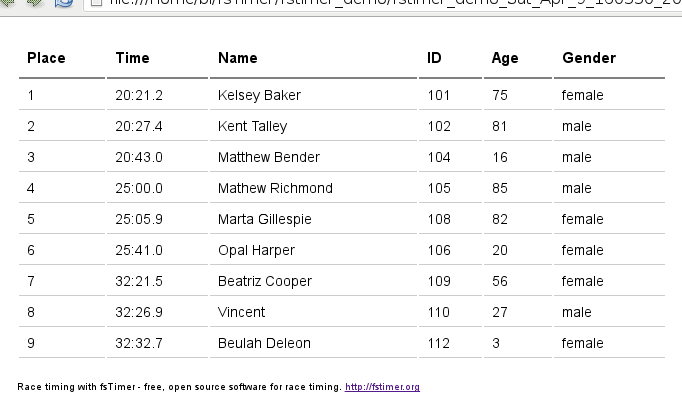
The results will automatically be sorted into places, and all of the fields that were chosen when creating the project will be filled in from the timing dictionary. If some information is blank in the database, this is not a problem; it will simply be left blank in the results. In particular, if a bib ID is not assigned to any racer (perhaps because it was overloaded) then the Place, Time, and ID will be filled in, but the remaining registration fields will just be blank.
Notice also that the "pass" IDs (0) do not show up in the results. Any times with pass IDs will be ignored when creating the results.
The divisional times are automatically generated using the registration information in the timing dictionary, and the divisions specified when creating the new project. The printed results will look something like this:
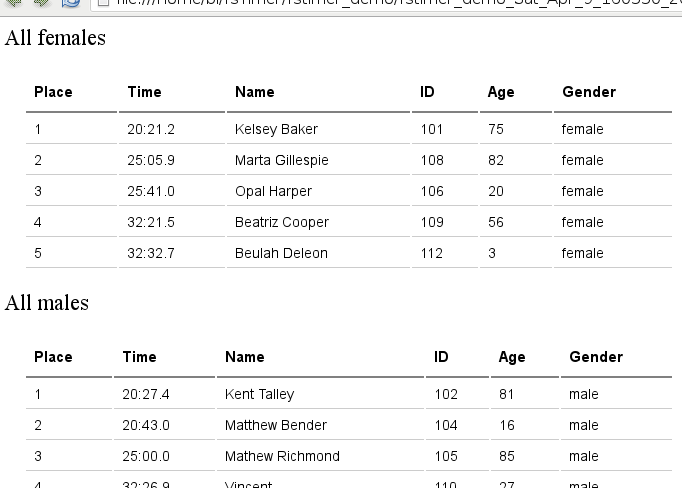
These divisions are defined by gender, so any IDs that do not have gender in the timing dictionary will be left out of the divisional results. Thus bib IDs that are not assigned to any racers in the timing dictionary will show up in the overall results as the bib ID, but will not show up in the divisional results at all.
In addition to writing out nicely formatted html files, you can write the results out to a csv spreadsheet by clicking on the "Options" button and then selecting "Save results to CSV." This will produce two csv spreadsheets, one for all times and the other for divisional results, with all of the same data that is found in the html files.
Loading and merging times
Timing sessions that have been saved using the "Save" button can be loaded by clicking on the "Options" button and selecting "Load saved timing session." A warning: This will replace any IDs or times that are currently in the timing window, and so if these data have not been saved they will be lost forever. Keep in mind that this will load the marked times, the bib IDs assigned to them, and the Start time. It will not reload the timing dictionary, this will still be whatever was selected when opening the Timing window.
It is possible to mark times on one computer and enter bib IDs on a separate computer - that is, create these two stacks separately - and then merge them after timing is finished. The two stacks can then be merged using these steps:
- On one of the computers (here we will use the stack of times, but it works just as well with the stack of IDs), press "Save". This will generate a file with a name like project_name_Sat_Jun_1_141030_2013_times.json, with the project name and the date/time at which the timing window was opened.
- Copy this file over to the other computer (the one containing the stack of IDs), for instance using a USB stick.
- On the computer with the stack of IDs, press "Save" just in case.
- Press "Options" and then select "Merge in saved IDs or times."
- The stack of times will now be added to the already present stack of IDs.
Editing the start time
Pressing "Options" and selecting "Edit starting time" opens a dialog through which the starting time can be edited:
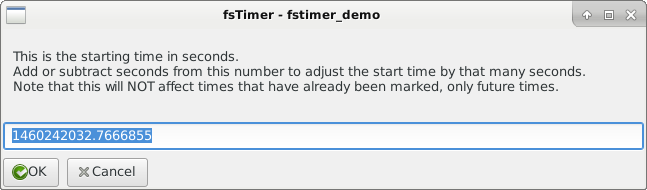
The long number in the entry box is the number of seconds since the start of the Unix epoch - but this isn't important. If you add or subtract seconds from that number, they will be correspondingly added or subtracted from the start time. For example, subtracting 300 from the number in the above screenshot yields 1460241732.76. If we were to replace the number currently there with 1460241732.76 then the start time will be pushed five minutes earlier. This will add five minutes to the current running clock time.
Importantly, if you change this time mid-race, it will not adjust any times that have already been recorded. Those times could be adjusted using the block edit functionality described above.
Pressing "Restart clock" in the "Options" menu will restart the clock to 0. As before, it will not change any already recorded times.
Making corrections to results
As mentioned above, times and their associated bib IDs can be edited using the "Edit" button in the timing window. You can edit times so that they are no longer in order in the window, like 110 in the screenshot below, and this is not a problem; fsTimer will correctly sort them when generating the results printouts:
You can also edit the registration data from the timing window, for example in order to correct overloaded IDs after the timing has finished, or to fix other registration errors that you notice in the printouts.
Choose "Edit registration data" from the "Options" menu, and this will open the registration database so that it can be edited. Changes will not be autosaved, so be sure to press "Save" before closing. The timing dictionary will be immediately updated upon closing, and so it will require that all of the IDs are unique. Once the edits are made and this window is closed, you will be back in the Timing window, but with the corrected registration data loaded. Pressing "printouts" will print results with the corrections.
This completes all of the details about using fsTimer for a standard, single-lap race - You are now ready to time the race! The next two sections describe additional details to know if you are timing a multi-lap race, or a handicap race.
Continue on to Timing multiple laps.