Section 2.5 - Race timing
Now that the registration database has been created and compiled, we are ready to time the race. Click "Time" from the main window. We are first asked to specify a timing dictionary, a "pass" ID, and the key to be used for marking times.
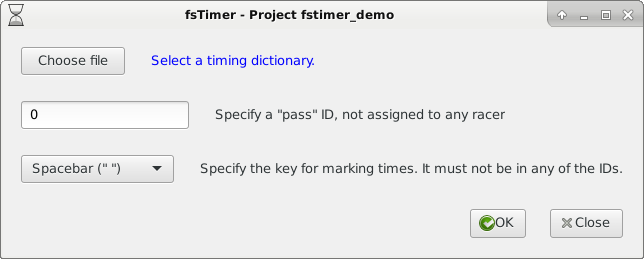
The timing dictionary is what allows the racer times to be correlated to the registration database entries. During timing, we assign race times to racer ID numbers (that is, bib numbers) as they cross the finish line. The timing dictionary is the database that looks up registration information (name, age, gender, etc.) by ID. Press "Choose file" and select the timing dictionary that we created at the Compile window (fstimer_demo_timing_dict.json). The "pass" ID is used to leave a marked time "blank", without any bib ID assigned to it. This will be useful for a number of scenarios that are described in Section 3.1. We usually use 0 (the number zero) as the pass ID, just be sure that 0 isn't one of your bib numbers. By default, spacebar will be used to mark times as runners cross the finish line but this can be changed to one of a few options.
Pressing "OK" leads us to the timing window.
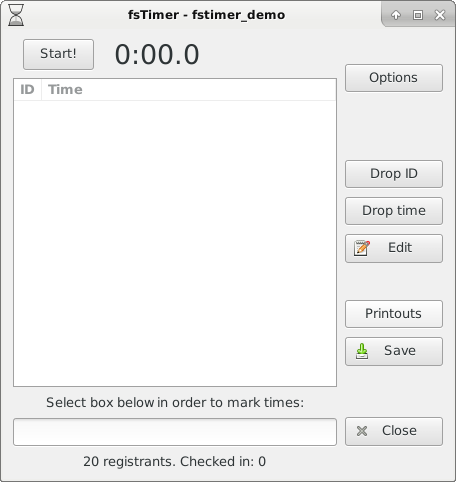
We press "Start!" right when the race begins, and this starts the clock ticking in the software.
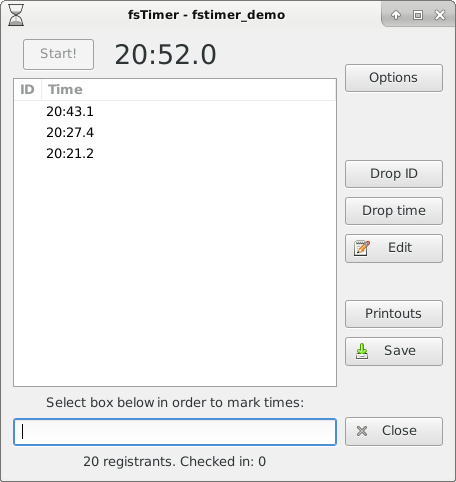
There are two main steps to timing: marking the times, and entering in the corresponding bib IDs. When each racer crosses the finish line, we press spacebar right when they cross and this saves the time at which they crossed. Also, the ID number of each racer that crosses must be stored in the database. When a crowd of racers come all at the same time, it may not feasible to enter their ID numbers as fast as they cross the finish line; thus these two jobs can be done separately, in parallel. In Section 3 we give some tips on how to operate the finish line. As long as a time is marked for each runner and the IDs are entered into the system in the same order, fsTimer will match up the IDs to their corresponding times.
Pressing spacebar to mark times puts "blank" times into the record, meaning, a time that does not yet have an ID associated with it. Here we have marked 3 times, and you can see that the "ID" column is blank for each time:
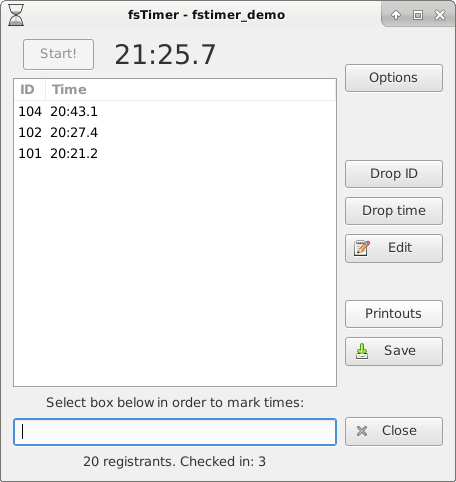
This is the stack of marked times, with the oldest (fastest) time on the bottom and the most recent time on the top. We now give fsTimer the ID (bib) numbers associated with these three times. We just type the numbers in and press "Enter." Or, if we have a barcode scanner, we scan the barcode. fsTimer will associate the IDs to the times in the order that we enter them. So entering IDs 101, 102, and then 104 gives:
That is really all there is to the timing: Mark the times when people cross the finish line, and then enter in the IDs in the same order that they crossed. Notice that if there is a large rush of people, you can focus on marking all of the times, and then come back and enter the IDs whenever things open up a bit; there is no hurry.
Pressing "Save" will save the current results to a file that can be loaded by fsTimer. Pressing "Printouts" will generate nicely formatted results files that will show the times along with registration info for the runner, such as name, age, and gender. The results are saved as html files in the project directory that you can open with any web browser and then physically print from there:
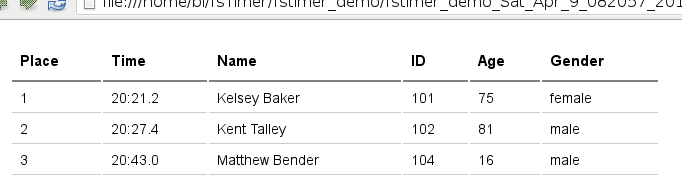
"Print" will automatically generate two html files in fact: Overall results that include everyone, and divisional results. Note that if you enter the pass ID (0) as the bib number for a time, then that time will not show up in the results at all. Basically the pass ID "skips" times, and leaves them out of the results.
The other buttons (Options, Drop ID, Drop time, and Edit) will be described in Section 4.5.
Press "Close" to exit the timing window. At this point the race will have finished, the results will be printed, and timing is done! Now that you have a general idea of how the software works, we will describe creating a new project, and then will go into details about both the process of timing the race, and details about the software.
Continue on to Section 2.6 Creating a new project.